Sunday, November 28, 2010

Akuma Finished

Here's the colored version, not too shabby! After colorizing the face I took a copy of the (B&W) face layer and duplicated it, laid it over top of the colored face and played with the multiplied opacity, to try and get some darker shadows in the face. I probably could have gone a little more. Always dread doing the hair, but I'm not too unhappy with this one. Would've added more purple highlights from the lightning but was afraid that with the red hair and all he'd start looking a little clownish.

Photoshop and Cintiq graphics tablet

Akuma Gray

Here is the finished B&W of Akuma, and another slightly revised (removed pupils and added lightning fx). I'm pretty happy with it. The big fear is whether the color version will look as strong.

Cintiq and Photoshop

Tuesday, November 16, 2010

Akuma WIP continued

Little further progression. Going back to doing it in gray first. The drawing "First day of school" I started and finished in color and there are some spots were the I picked up the wrong color.


Akuma Cosplay Work In Progress

WIP of a friend dressed as Akuma from Street Fighter. Thought I'd put some pressure on myself by putting up a WIP and see if I can get'er done over the weekend.

Monday, November 1, 2010

First Day of School-Finished

Finished drawing of First day of school. Actually warped the face a bit from the WIP version. Made the chin smaller, and the face thinner. Learned some things with the hair, it's in about 10 layers, broken into sections "Back", "Front", and "Side." Laid down the base brown, then a yellow, and another brown on top of the yellow. Then I did highlight streaks, but it started looking like she had gray hair so I laid down some black streaks which really helped it a lot (IMO). Think if I were a little more patient with it that hair would've rocked.


Photoshop, Cintiq tablet


First Day of School-WIP

First thing I've really worked on since the end of August. I need to crank things up a bit. Fortunately starting in November I have a handful of vacation days coming my way. I need to really make use of them. This drawing is the child of one of my facebook friends. Things were kinda slow at work so I started this, did the hair but it's lame. I'm gonna redo it.


Sunday, August 29, 2010

Patricia_Color

Here's the finished color version, I think I learned an effective way of doing Hazel eyes. When she told me her eyes were Hazel I was going to steal them from a jpg on Google. But I decided I would be missing the whole point of doing  these and that's to better hone my skills. So I laid down the primary three colors that make Hazel eyes so (ahem) weird looking Green, light green/yellow, and orange solid dots one on top of the other with the green being the largest then light green and finally the orange dot in the middle. Then I used the smudge tool set on 50% strength and smeared it back and forth across the diameter rotating until it looked like a starburst. And over-lay them to her eyes.

Patricia_Gray

Here's the finished grayscale painting done of a coworker. I started last weekend and finished it by mid-week, which left plenty of time to color it and move on.

Sunday, August 22, 2010

Greg and Reece

A quick caricature of Greg and Reece two friends that took off for Cali. They look a lot pastier than they really are but I'll live with it, maybe on my machine at work I can adjust the colors a bit.

Sketchbook Pro, Photoshop on Cintiq

Saturday, August 21, 2010

Hand Study

Just a practice piece, from a picture I snagged from a Google search "hand gesture".

Sketchbook Pro, Photoshop, on Cintiq

Sunday, August 8, 2010

Practice drawing

A practice run in tightening my work.

Sarah gray

Here's the grayscale finished caricature of Sarah. I bailed on the sweater and did some lame-o grabbing a fabric texture and layering it in. I may change it when I color it. I was just wanting to finish it so I could move on to bigger and better game. I've been eyeballing some new techniques I want to try.

Playing with Sarah's face

Sketch of my friend Sarah.


Friday, July 23, 2010

B001 & B003 colored

Sat down and colored both caricatures. Still need to experiment some more with coloring, mine look kinda flat. I've seen some other artists work and when they go from grayscale to color, their color looks a bit more  natural, I guess.

Sunday, July 18, 2010

B003 Grayscale

Got this one done pretty quick using the same process as I did with B001. After I fleshed out the initial doodle around 4:00 p.m. I was done about 3 or 4 a.m. I'm liking it, though I don't know how she's gonna react to being called a moon head, I suppose that shouldn't be a concern of mine I should just draw what I see.

I'll see about coloring these tonight. But I do have some freelance work I need to get ahead on.

Done with: Cintiq using Sketchbook Pro and Photoshop


B003_Sketch

After halting on B002 I ran errands with my son to step away from the drawing for a bit. When we returned I was going to start a different caricature but lightly doodled this pic again this time exaggerating her forehead as well and liked where it was going.

I enlarged the doodle and fleshed it out to the line drawing here. I had said with B001 I was going to try and get her making a funny face but I'm realizing that candid pictures are pretty good sources.


Done with: Cintiq using Sketchbook Pro.

B001 Process

Here's a simplified view of the process. Actually once I got into it I forgot to save out the steps. But this is the first (the sketch), second (laying down a base tone), and third (start shading using the sketch as guidelines). Basically I continue step three (with my brushes flow set to 3-5) until the sketch begins to get in the way then I turn it off and finish the face. I'll turn the sketch back on to do the hair. I usually do the hair and/or the eyes last.


B001 Sketch

One of my coworkers. I may try and get her to make a funny face for me to photograph and use. I think that makes it a little easier for me to exaggerate the features if the subject is already looking goofy.


Maryts' BF

This one was a test of sorts, to see if I could do another caricature (and quit ridding on the coat tail of the first one) more importantly of someone I don't know. One of the members of Drawingboard.org posted these pictures of her boyfriend so I thought I would try and do a caricature of him. It was a little harder than I thought it would be.

Revised & Colored

After getting some feedback on the grayscale image I revised the drawing: Got rid of the sharp canine tooth, reshaped his ear a bit and his upper lip. Then added color. I need to work on the coloring because to me it kinda looks like one of those Turner Classics that they've colorized. Something's missing in the black and shadow areas. I'll search around and try to  find some tutorials on coloring from a grayscale image.

Sunday, June 13, 2010

Little bit of gray

When I went in search of more tutorials I cracked open "The Famous Artists Course" lesson 16: Color–the theory and practice of painting. From that it sounded as if you should do your painting in grayscale first, it said to get better control of your values (shadows and highlights). That seemed to go with what I've seen around. The artists that I think are good, they all seem to start out with the image in grayscale. Saved the hair for last cause I thought it was going to be the hardest but it ended up being the easiest. I got some pretty good feed back on this some people thought I used a program to manipulate the photograph.

Process: Photoshop and Cintiq. Laying down a gray under tone to get started. Then setting my brushes flow to 3 and drawing in the shadows and highlights. I got a real sense of drawing when I was doing this, felt like I had more control.

The hair was done on it's own layer with some brushes that where made up of dots (3-6) and just made a bunch of swirls until I got the overall shape I wanted then on another layer beneath this I put white using just a circle brush, but then the hair was too bright so I add yet another layer between the hair and the white layer and made more swirls the fill in some of the gaps.

For real Ro

After searching for more/better techniques I found Digital Art Tutorials, the disc Digital Painting: Super Babes. I thought was very useful. Using that tutorial a few times, I wanted to test what I learned on something before I used it on my son's caricature. I dusted off the Ensign Ro sketch and ran the tutorial while I worked on the drawing. It didn't look as real as Brian Haberlin's (he demonstrated the tutorial) Jessica Alba as Sue Storm looked but IMO it was far better than what I've done thus far. Except her hair, I bailed on the hair.

Process: Adobe Photoshop and Wacom 12" Cintiq applying the color with paint brush set at various levels of flow.

Caricature


I've never done a caricature before (that's a-whole-nother art form, but I'm diggin what I've drew so next step is to paint it. I still don't think my kung fu skills are as good as I want them. So I do like they do in the Kung Fu movies when the hero gets his egg rolls handed to him by the bad guy; go up in the mountains and train.


Drawn using Sketchbook Pro.

Drawing on the Fringe


I did this one in the attempts to start a thread on drawingboard doing my favorite cast members of Fringe, starting with the actor Kirk Acevedo as Agent Charlie Francis. Then just as I was almost done they took him off the show. My guess was to make room for Leonard Nimoys salary. I was digging this one but certain elements stand off the piece. I don't know if it's because maybe I used a brush with too hard an edge bur when you look at it a little closer the eye lashes, brow, and hair seem to on the image not part of the image. Like somebody did it with a Sharpie afterwards. And his chin is too small.


Process: Started this in Sketchbook Pro, since I didn't know how to color it using SBP I moved it to Corel Painter to finish it. I need to watch more of Bobby Chu's YouTube videos. I did the same as in the Alex B. portrait, I may have embellished a bit. I used more layers with this one putting some shadows and highlights on their own layer. Don't think that worked out so well.

Alexis Bledel


Don't really follow her work, found this image in my folder of faces,  (images I've gotten from the web and thought they might be a good shot to try and draw one day.) Didn't even know who she was, the jpg had the photographers name on it. Then a friend at work told me who she was. Her eyes in this picture is what did it for me.


Process: This was done in Corel Painter, using what I learned from the tutorial. I posted an animated gif so you can kinda see start with a sketch, rough in some color, use the blend tool to smooth out the colors then put your finishing touches. I was happy with this one but I think it still has a bit of a "Poster-Paint" look to it. I think my colors are too pure maybe.

Trying to bone-up


I searched the web for tutorials on painting so I could take some crash courses and finish the Forbes portrait. I found this one and got started on it then checked in on the Jam on drawingboard and much to my surprise the guy that runs the site "Em" had, by chance, picked the same image for his contribution. Not only that, he finished his while I was sitting there with a half baked sketch and a partially digested lesson.

Needless to say it took all the wind out of my sails, I wasn't about to post the same image. That would be like signing up for Tee time and after you got your equipment together and got out on the green you see Tiger Woods just hit a hole in one from there. Or showing up at a party wearing the same outfit as someone else. I didn't even finish the tutorial, which was basically laying down some color then using the blend tool to get smooth transitions in the colors.

Ro Laren Sketch


Over on the drawingboard.org a Star Trek Jam opened up a I thought I would get in on it. I did this sketch of Michele Forbes as Ensign Ro Laren using Sketchbook Pro. I was pretty pleased with the sketch but knew I didn't have the chops to do a good coloring job yet.

Dylan


This was a test I believe using Sketchbook Pro. Felt kinda awkward cause I wasn't as familiar with the app. I'm really hoping to get better with SBP cause I think it's a great program. IMO WACOM should buy it from Autodesk and pack it in with all of there tablets and sell it as a stand-alone app (for people with the competitors tablets).

I know ArtRage not only does the same thing, is cheaper and even practically has the same look and interface but SBP is like the Mercedes of the two. On a few occasions when doodling with it I caught myself sweeping my hand across the Cintiq's screen trying to brush away eraser crumbs (as if there would be any) it felt and looked that natural.

Flesh Egg

Look at it! Need I say more? My first attempt at something after the first two lessons.

Learned from the Book

Here are the end result of two lessons from chapter 2 of the book. The lessons got me familiar with handful of the brushes. When starting the pepper it doesn't look like it's gonna look very good but it actually looks nice.

Saturday, June 12, 2010

Trying to learn Corel Painter

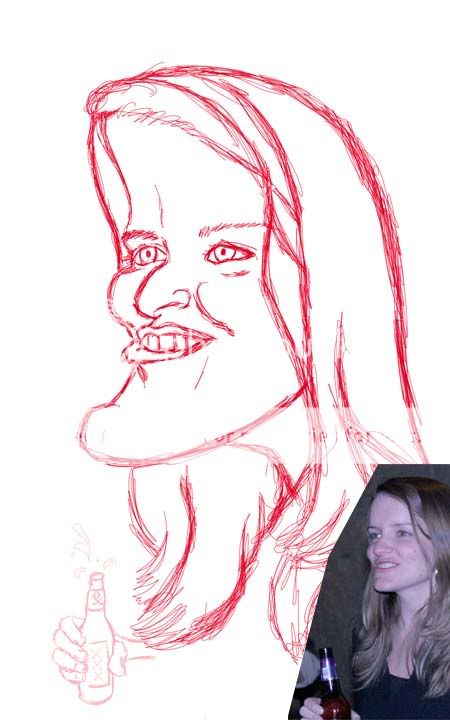
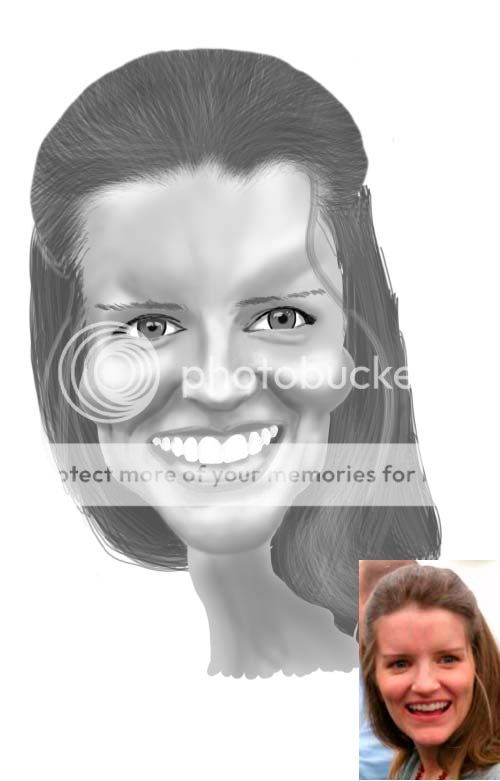
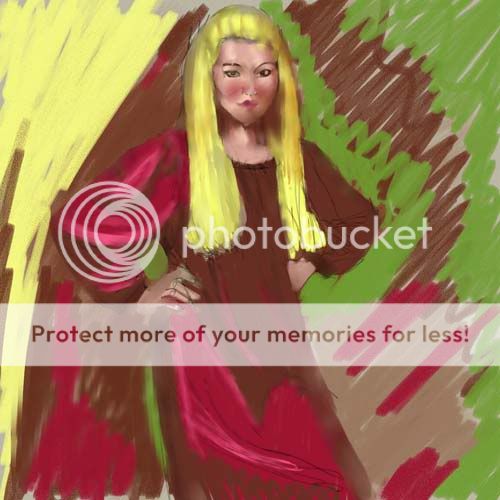
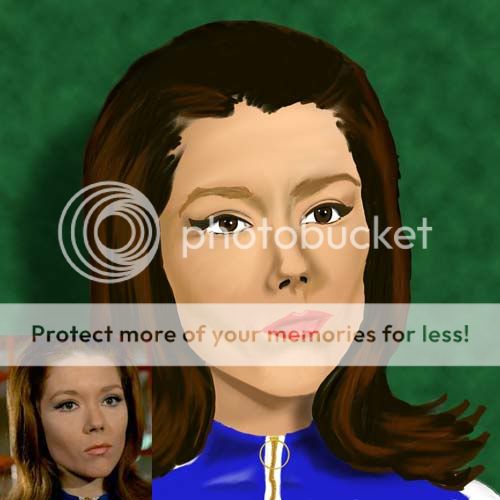
I bought a book "Digital Painting Fundamentals with Corel Painter X" by Rhoda Grossman. It looked like a good buy because IMO it had lessons in it that I was looking for (i.e. showing me how to start from scratch. Not just painting over or onto a photo. When I went to Barnes & Nobel to thumb through some books I kept seeing photo manipulation or painting that looked a bit too cartoony. And whenever I'd find somewhere online somebody flat out asking another for help in getting started many times I'd see an answer "just play around with the brushes and see what works for you."

To me that's kind of a lame answer. Maybe it's more of a "Hey, I put in the hardship and effort to learn it, so should you." "Nobody gave me any handouts." Eh, I guess that has it's merits I mean no one wants some lazy-ass getting praise and credit for doing something they didn't have sense to figure out for themselves. I've had someone ask me questions about Adobe Illustrator "Hey can you do this in Illustrator?" and I'll answer "No, not to my knowledge." and they just stare at me... "But you should be able to do that right?" And I'm thinking dude, I don't write the freaking program I use it just like you.

Alright I'm starting to go off on a tangent. Anyway I think that is good advice play around with the brushes, but I never shy away from pointing someone in useful direction hoping they'll have the sense to expand from it. Sitting here flipping through I only used chapters 1 & 2, depending on what you're wanting to do with Painter, it probably wasn't worth the price I paid for it, new, used might have been better.

The Immaculate Mrs Peel

Again logging my journey to bettering my art skills but this time I want to try to be a little more informative in regards to the process' of digital painting. I've always thought the program Painter was cool, but if you've ever seen it and the choices you have available to get the end result is mind-boggling. I've also fancied Art Rage, Sketchbook Pro, and I use Photoshop for work with a 12 inch WACOM Cintiq graphics tablet so I'm pushing myself to learn these apps.

There was a drawing jam started on drawingboard.org of Diana Rigg and I contributed this which I did using Photoshop and falling back on my techniques of coloring with colored pencils. I posted the piece and got back the critique that it was good but it looks like it was done with poster paint (I agree).

Process: I drew the image then added color from the swatch in Photoshop, using the smudge tool to try and blend the colors together. In the same way I would with the Prismacolor pencils.